
puppet stage instructions
HOW TO MAKE A PUPPET STAGE
This puppet stage was made as an Eagle Scout project for the Columbine Branch children's department of the Jefferson County Public Library in Littleton, Colorado. The stage accommodates two puppeteers sitting side by side. The puppeteers control the curtain, lighting and movement of characters from behind and are never visible from the front. There are provisions for stationary objects and characters on stage. If quality materials are used in construction the stage will be durable and last indefinitely.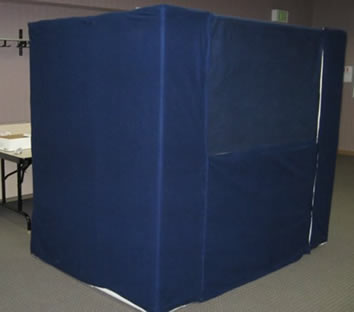
MATERIALS LIST
- 120' 1 ¼" Schedule 40 PVC pipe - this will allow for waste.
- 14 T connectors
- 4 L connectors
- 4 X connectors
- 4 corner connectors (three dimensional: +X +Y +Z axes; 3 way elbows must be special ordered)
- 2 edge connectors (three dimensional: +X +Y +Z & -Z axes; 4 way elbows must be special ordered) You might be able to order these last two items from Savko Plastic Pipe and Fittings Inc in their PVC Furniture Fittings section. See http://www.savko.com/
- 12 yd. dark colored velour bathrobe material
- 1 2' florescent light fixture
- 1 6' 1"x10" pine (for stage)
- 14' of strip Velcro (other means can be used to affix fabric to the frame, but Velcro was used on this project to provide for quick set up and take down; pegs and grommets or snaps could work just as well.)
- Thin nylon rope (for stage curtain draw string)
- Screw eyebolts (as draw string guides)
- 4' of 1/8" steel rod (to add weight to bottom of stage curtain (sewn in)
- E5000 glue (to glue Velcro to fabric and pipe) DO NOT USE HOT MELT GLUE
- Old broom handle (for stage curtain draw string handle)
- 2 yd. of black material (for backdrop curtain, preferable slightly see through)
- 6' of lightweight chain (to suspend light fixture)
- 16 ½" plastic eyelets (for stage curtain ropes)
DIMENSIONS
Exact lengths of cut PVC pipe segments are shown on the schematic diagram and are titled "PVC PIPE CUT LENGTHS." These lengths account for the amount that is inserted into the connectors. It is recommended that you reproduce these dimensions exactly as specified there. However, if you are the type that is inclined to alter the plans, the following is a list of critical dimensions around which this theater was designed. If you alter these dimensions you should first get a consensus from whomever is going to be using the theater.
- The top of the stage floor (6'; l"x10"; board) should be 38" from the floor.
- Overall height of the theater is 6'.
- Overall width is 6'.
- Overall depth of theater is 4';.
- The width of the stage opening is 4' (leaving 1'; on each side for wings).
- The height of the stage opening is 24" (leaving 10" of curtain above to conceal the light fixture: 38" + 24" + 10" = 72" or 6'; in total height).
- Leave 6" between the inside edge of the stage floor board and the backdrop curtain for puppeteer's arms.
- Backdrop curtain should come down 1" beneath the top of the stage floor board.
CONSTRUCTION
Refer to the photographs for details. A picture is worth a thousand words.
The framework is made of 1 ¼" schedule 40 PVC pipe. Do not use anything less substantial as it will not maintain its shape when a load is applied. It was only partially glued together so that it could be easily assembled and taken down. It was glued into 4 segments: each side (2), and the front into a top and bottom (2). The PVC pipe which holds the backdrop curtain is a separate additional piece.
As you can see the stage floor is notched so that it fits into the PVC framework. This provides for support to the front of the board. There is no other support as it spans the 6' across the theater. Note that there is Velcro glued to the front of the board to attach the curtain. Wrap the Velcro around the side of the board to keep it more secure.
No dimensions are given for the notches on the stage floor. This is best done by sight as you fit the board onto the front of the framework. Note in the photo that a T connector was cut in half and glued onto the horizontal PVC pipe on each side to keep the board in place.
The florescent light fixture is suspended from side to side to allow for unencumbered movement of the front curtain and removal of the PVC pipe holding backdrop.
The fabric was sewn into 4 separate pieces. Each side is one piece that wraps around the front to the edge of the stage opening. The third piece is in the front beneath the stage floor and the fourth piece is the stage curtain itself. A few pieces of Velcro were used to keep the fabric together in front. If you sew the entire covering into one piece it will be very difficult to position properly if you are using Velcro as a means to attach it.
Since bathrobe material can be slightly transparent when a light is shining through it, a backing was sewn into it made out of the same material as the backdrop. This was sewn in behind the stage curtain and behind the rest of the material in front but only two feet around the sides toward the back.
Since the front framework was glued (but separable into two pieces, top and bottom) the stage curtain was attached to the top PVC pipe with Velcro. Both Velcro parts were hot melted to the curtain and the curtain is wrapped around the pipe. It can then be removed. However, the eyebolts for the curtain draw string were screwed through the curtain into the PVC pipe and would first need to be removed to remove the curtain. So the stage curtain remains on when disassembled and is simply wrapped around the PVC pipe.
A sleeve was sewn into the backdrop curtain so it could be slid onto the PVC pipe allowing for easy removal and use of other backdrop scenes.
Four separate and equally spaced ropes are each passed through four plastic rings on the back of the stage curtain for the draw string. Each rope is tied to the bottom ring and run vertically to the top and there passing through a metal eyelet (screwed into PVC pipe) and then run off the right and tied together as one rope. The rope is then routed by eyelets down the side of the framework and is completely operable from behind the backdrop curtain. Once the curtain is up the rope is secured by a cleat which is positioned behind the backdrop curtain on the right side. You may have to experiment a little to get the curtain to fold nicely while being raised.
The metal rod sewn into the bottom of the stage curtain as a weight will keep the curtain in contact with the stage floor when lowered and provides the needed weight for its operation.
The funny looking contraption on the rear side of the stage floor (board) is a Rube Goldberg attempt to provide an arm rest for the puppeteers. One on each side is provided (left & right) and are independently adjustable. This little feature is the one most in need of improvement.
The puppeteers needed a way of placing stationary characters on stage. Additionally, they needed to be able to be placed on and off stage quickly without the audience being able to see the puppeteers hands. To accomplish this a ¾" wide slit was cut into the board extending from behind the wings out almost to center stage. One was cut on each side. Two 18" lengths of broom handle (3/4" round dowel) were cut and slipped vertically through the ¾" slit in the stage floor. A hand puppet is slipped over the portion of the dowel that is above the stage and the puppeteer moves the puppet by holding the portion of the dowel that extends under the stage. To keep the broom handle vertical when released, it is passed through a ¾" hole drilled in the center of a 4" round wooden disk. The disk holding the vertical broom handle rests on top of the stage.'
Both the slit cut in the stage floor and the hole drilled in the center of the wooden disk are sanded out so that the broom handle slides freely through both (up & down and left & right). Now to prevent the broom handle from falling to the floor when released a coiled rubber band is slipped down onto the broom handle from the top. This rubber band also allows the amount of broom handle showing above the stage to be adjustable to accommodate different size puppets.
This pretty much is everything you need to know about this puppet stage. It's a low tech design and very durable and serviceable. Neither is it over or under designed. Good Luck!
STAGE FLOOR BOARD 6 ‘ 1" X 10"
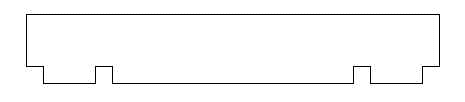
Notches cut into the floor board should be placed by sight after your framework is completed. The notches allow the front edge of the board to be flush with the front face of the puppet theater. They also provide support for the board as it extends across from the left side to the right. No other support is provided for the board.
Diagram of stage dimensions
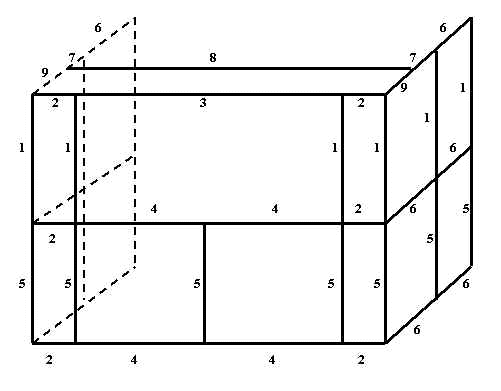
[#s refer to the pipe labels in the above diagram]
#1 = 33-1/16" (cut 8)
#2 = 8-9/16" (cut 6)
#3 = 47-11/16" (cut 1)
#4 = 23" (cut 4)
#5 = 33-1/2" (cut 9)
#6 = 21-1/4" (cut 10)
#7 = 7-1/16" (cut 2)
#8 = 68-1/4" (cut 1)
#9 = 12 -1/2" (cut 2)
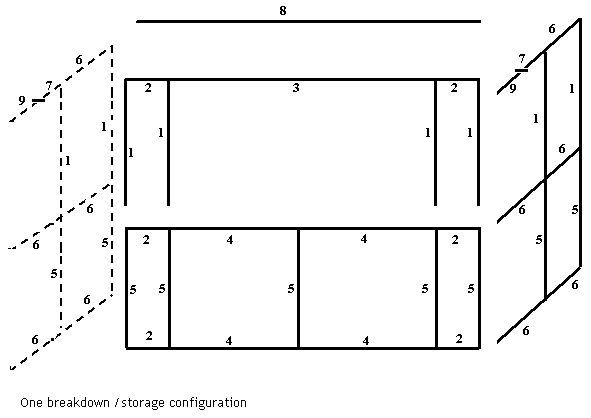
Shannon's note: You can glue together the PVC pipe and fittings for different storage possibilities. The figure below illustrates how the Columbine stage is broken down into 5 basic pieces plus the stage. The entire stage, with curtains, can be assembled in under 15 minutes, and breakdown takes five minutes. It stores in a 1' x 6' space, and does not travel. I have also built my own personal stage which I store in my basement, which is permanently glued along all the longest pieces, with the shorter pieces left unglued. My stage stores in an approximately 2 foot square space, and easily fits in my van.
These instructions and blueprints for the Eagle Scout Hand Puppet Stage are provided as a free service to the library community, the Boy Scout community, and the puppetry community. The instructions are an original compilation of this Eagle Scout project and are not to be sold. The designers, George and Kevin Schultz, welcome the use of the instructions by organizations that wish to construct a stage for themselves. .
Puppets from
 Shark Puppet

Find More Puppets like these at KazooToys.com
Puppets from
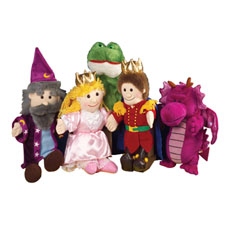 Royal Puppet Set
 Farm Animal Puppet Set
Find more puppet sets like these @
ConstructivePlaythings.com ...